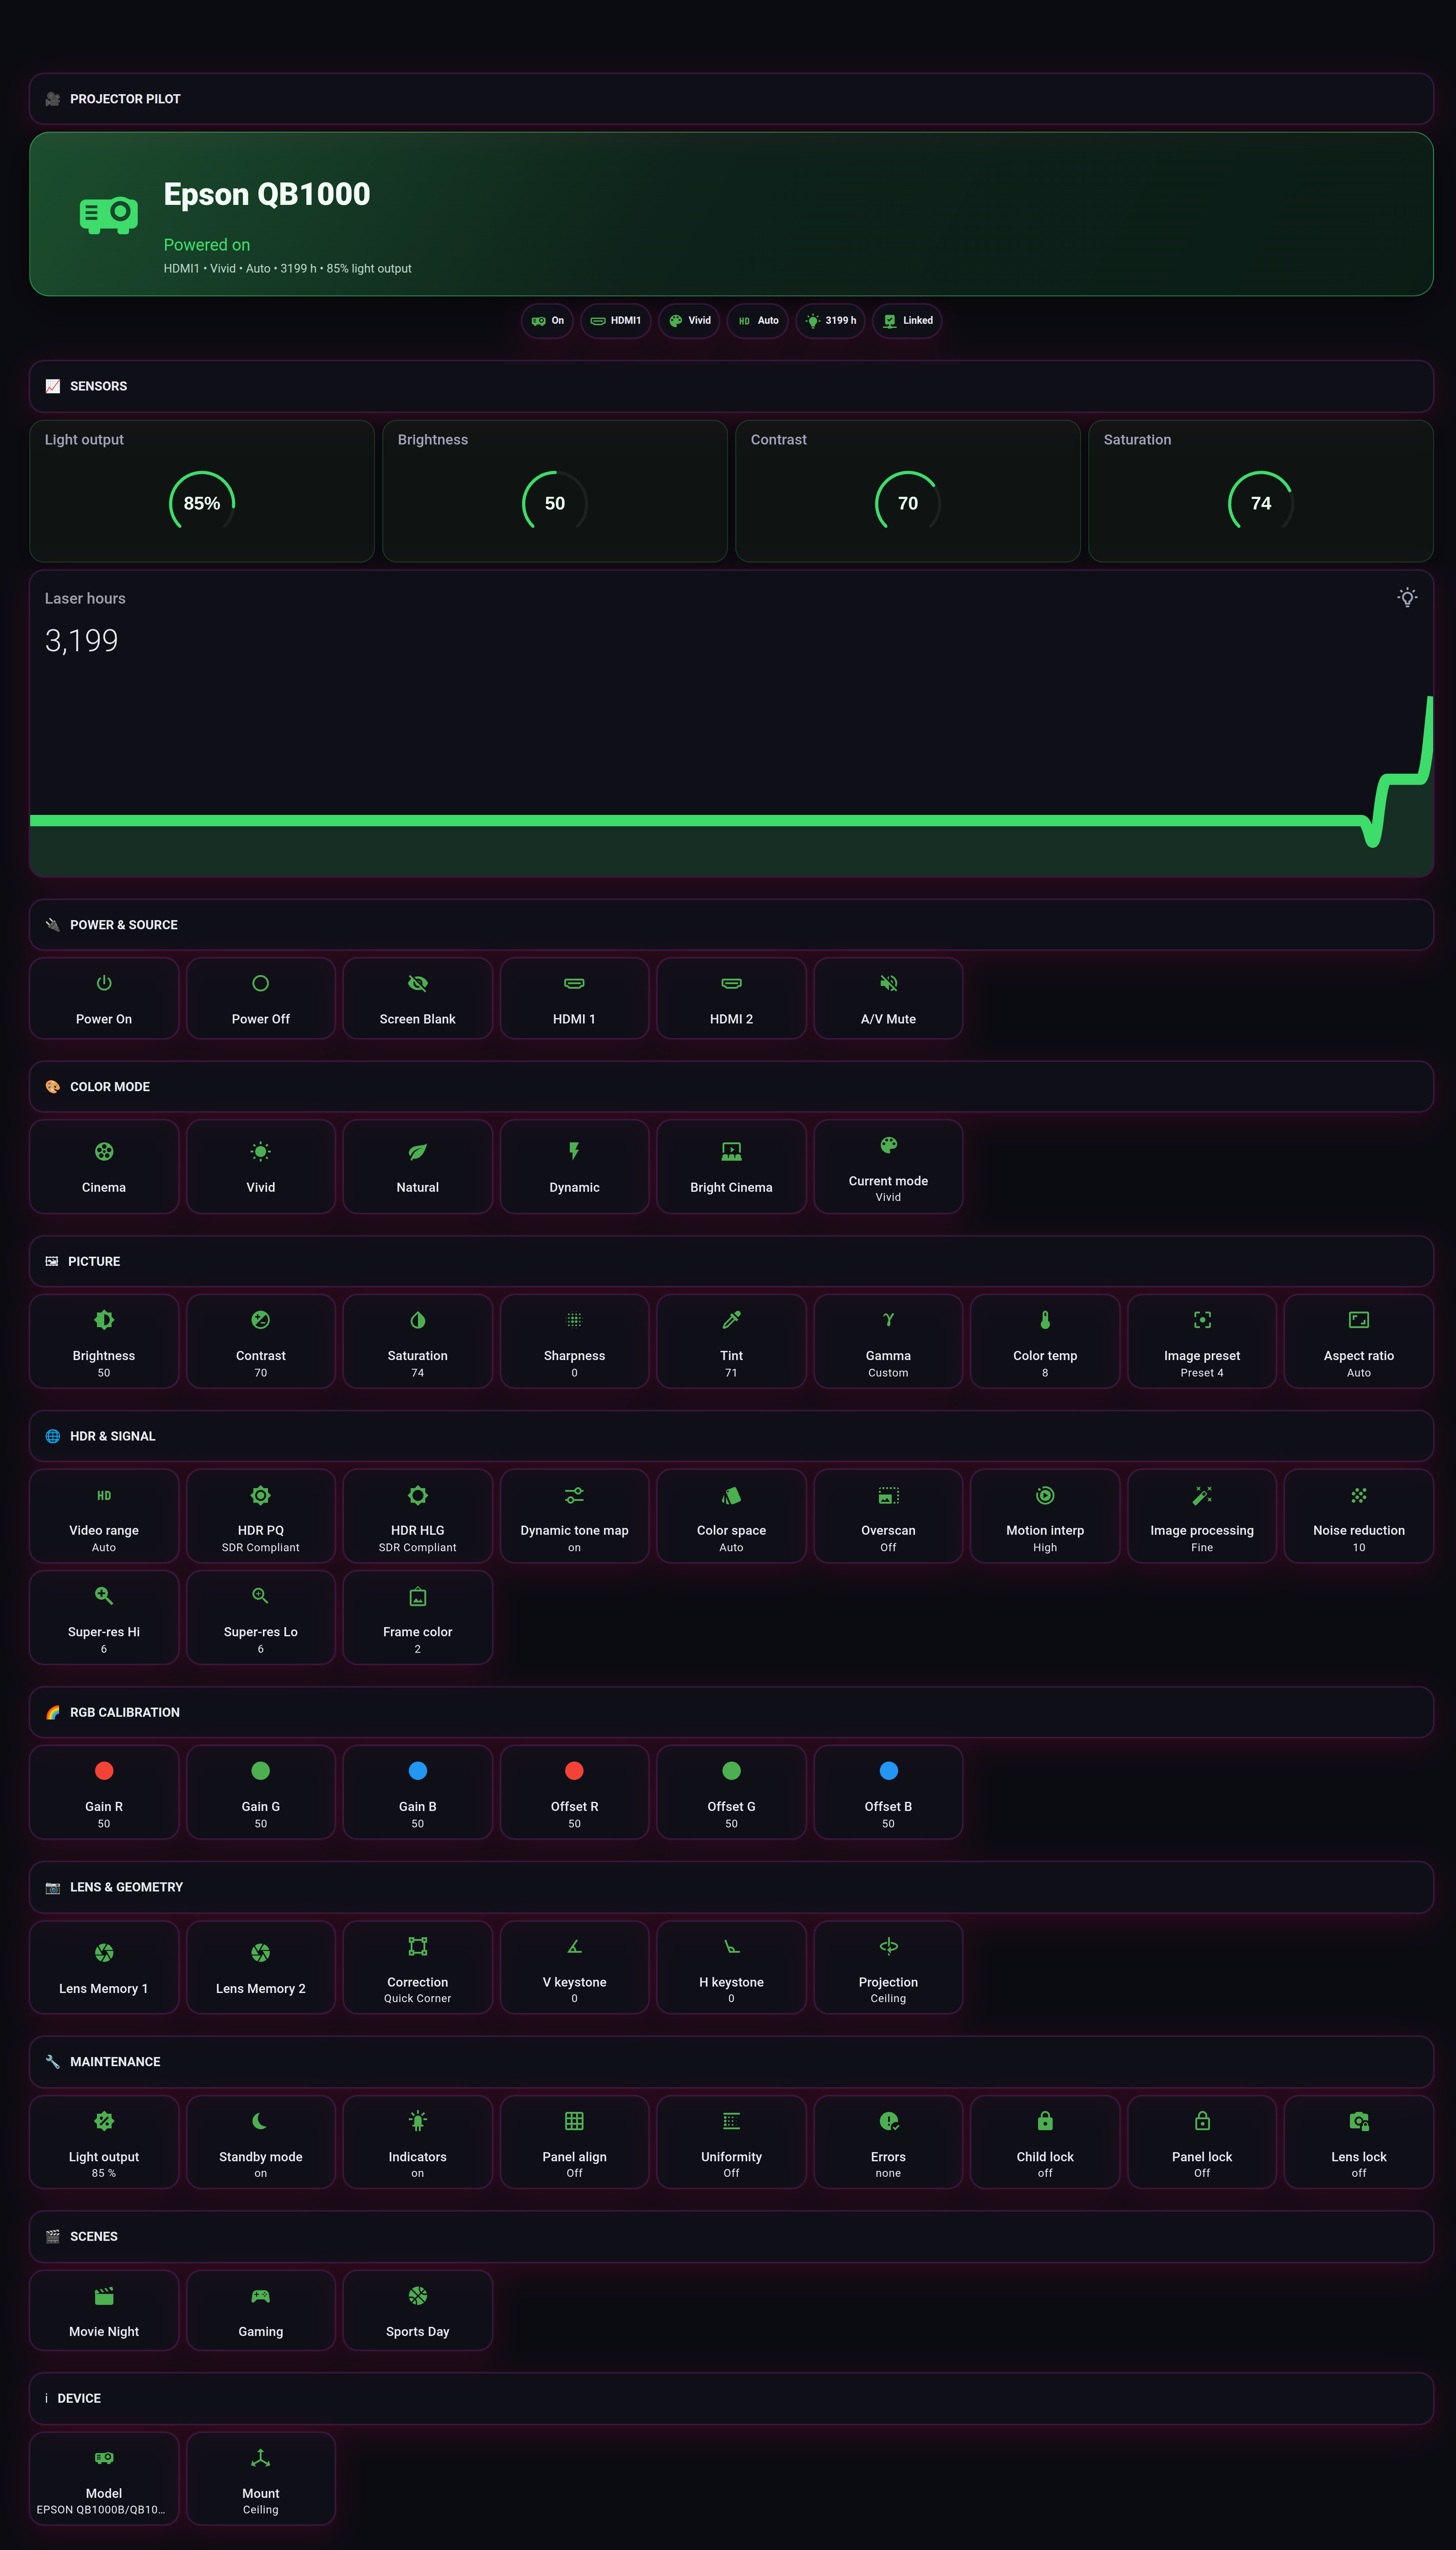
Ten steps, every card's YAML, and a complete view you can paste in one go. Green glass tiles, a live picture readout, your Scenes, and a laser-hours graph, all off one projector sensor. Change two strings and it is yours.
configuration.yaml and restarting Home Assistant. This is what creates the scripts every control button below calls.Two things feed this dashboard, and the difference matters at every step below.
| Comes from | Gives you |
|---|---|
The projector sensor, sensor.YOUR_PROJECTOR | Every reading. Power, input, color mode, all the picture figures, HDR and signal, lens and geometry, lamp hours. Live as soon as you sign in and sync, no Copy block needed. |
The app's synced scripts, script.projpilot_YOURSERIAL_... | Every control. Power, inputs, color modes, lens memories, and your Scenes. These exist only after the Copy block is pasted, Home Assistant is restarted, and you have tapped Sync With HA. |
All four are in the default HACS store. In Home Assistant: HACS › Frontend › Explore & Download Repositories, search the name, Download, then reload your browser.
| Search for | Used for | If you skip it |
|---|---|---|
| Mushroom | Every info tile, control button and Scene tile | Use a plain button card. Works, looks squarer. |
| button-card | The hero, with its live label | Use a entity card, or a Mushroom template card with less detail. |
| card-mod | The green glass background, borders and gradients | Everything still works. Nothing gets its glow. |
| mini-graph-card | The laser-hours history under Maintenance | Use the built-in history-graph card. |
Every snippet on this page uses two placeholders. Find yours once and the rest is copy and paste.
sensor.YOUR_PROJECTOR → Developer Tools › States in Home Assistant, filter on projector_pilot. Something like sensor.projector_pilot_epson_qb1000b_qb1000w.YOURSERIAL → open the app, Settings › Home Automation › Home Assistant. The serial-derived id is shown right there, and it is the middle of every synced script name: script.projpilot_YOURSERIAL_power_on, script.projpilot_YOURSERIAL_input_hdmi1, and so on.You can also filter Developer Tools › States on projpilot to see your whole synced control list at once, once step 1's Copy block and Sync are done.
The view's own settings, if you prefer to type them:
title: Projector Pilot
views:
- title: Projector Pilot
  path: projector-pilot
  icon: mdi:projector
  cards: []
Start with something that only reads, so you know your entity ID is right before you touch anything that sends a command. This one is live the moment your projector sensor exists, no Copy block, no sync. Add a card, Edit in YAML, paste:
type: custom:mushroom-template-card
primary: Brightness
secondary: '{{ state_attr(''sensor.YOUR_PROJECTOR'',''brightness'') }}'
icon: mdi:brightness-6
icon_color: green
layout: vertical
fill_container: true
card_mod:
  style: 'ha-card { background: rgba(18,26,20,0.60); border: 1px solid rgba(61,220,107,0.20);
    border-radius: 16px; box-shadow: 0 6px 22px rgba(0,0,0,0.32); backdrop-filter: blur(8px);
    min-height: 104px; }'
Same shape reads any of the ~80 attributes the sensor carries: swap brightness for contrast, gamma, color_temp, hdr_pq, lamp_hours, whatever you want on the tile.
Save it. If a real number or word shows up, your entity ID is right and everything below will work. If it shows blank, go back to step 2.
A plain title is dead space. This is a markdown card with a gradient background from card-mod, and it is what turns a stack of tiles into named sections. Every section on the board opens with one of these, just a different label and emoji.
type: markdown
content: '🔌    **POWER & SOURCE**'
card_mod:
  style: 'ha-card { background: linear-gradient(135deg, rgba(61,220,107,0.30), rgba(16,120,60,0.30));
    border: 1px solid rgba(61,220,107,0.45); border-radius: 14px; box-shadow: 0 6px 20px rgba(0,0,0,0.3); }
    ha-markdown { padding: 12px 20px !important; } ha-markdown p { margin: 0 !important;
    letter-spacing: 3px; color: #eafff0; font-size: 14px; font-weight: 700; }'
Change the emoji code and the label text; the card-mod block is identical on every section.
This one sends a command instead of just reading a value, so it needs the scripts to exist first. It calls script.projpilot_YOURSERIAL_power_on, which the app writes only after you paste its Copy block into configuration.yaml, restart Home Assistant, and tap Sync With HA.
type: custom:mushroom-template-card
primary: Power On
icon: mdi:power
icon_color: green
layout: vertical
fill_container: true
tap_action:
  action: call-service
  service: script.projpilot_YOURSERIAL_power_on
card_mod:
  style: 'ha-card { background: linear-gradient(135deg, rgba(61,220,107,0.16), rgba(16,90,46,0.20));
    border: 1px solid rgba(61,220,107,0.34); border-radius: 16px; box-shadow: 0 6px 22px rgba(0,0,0,0.32);
    min-height: 92px; }'
Same card for Power Off, Screen Blank, HDMI 1, HDMI 2, A/V Mute, a color mode, or a lens memory: only the label, icon and service change.
The hero at the top of the board is a button-card: a big power state, a one-line summary built from several attributes at once, and the green glass treatment on the whole card rather than just its border.
type: custom:button-card
entity: sensor.YOUR_PROJECTOR
name: Epson QB1000
show_state: true
show_label: true
size: 48px
state_display: '[[[ return entity.state==''on'' ? ''Powered on'' : ''Standby''; ]]]'
label: '[[[ var a=entity.attributes; return (a.input||''-'')+''  •  ''+(a.color_mode||''-'')+
  ''  •  ''+(a.video_range||''-'')+''  •  ''+(a.lamp_hours||0)+''  h''; ]]]'
styles:
  card:
  - height: 176px
  - background: linear-gradient(135deg, rgba(61,220,107,0.32), rgba(11,64,34,0.6))
  - border: 1px solid rgba(61,220,107,0.5)
  - border-radius: 22px
  - box-shadow: 0 12px 36px rgba(0,0,0,0.42)
  - padding: 20px
  state:
  - color: '[[[ return entity.state==''on'' ? ''#3ddc6b'' : ''#8a9'' ]]]'
Trimmed to the pieces that change per install. The full card also sets the icon, name and label grid positions; see the download in step 10 for all of it.
Prefer a slimmer strip instead? A mushroom-chips-card does the same job in one row of small chips: power state, input, color mode, video range and lamp hours, each a template reading state_attr('sensor.YOUR_PROJECTOR', ...). Use one or the other, not both, at the top of the board.
Every Scene you save in the app becomes a script named script.projpilot_YOURSERIAL_scene_<id> once you sync, and a tile for one is the same control-button card from step 6 with a Scene name and icon.
type: custom:mushroom-template-card
primary: Movie Night
icon: mdi:movie-open
icon_color: green
layout: vertical
fill_container: true
tap_action:
  action: call-service
  service: script.projpilot_YOURSERIAL_scene_YOURSCENE1
card_mod:
  style: 'ha-card { background: linear-gradient(135deg, rgba(61,220,107,0.16), rgba(16,90,46,0.20));
    border: 1px solid rgba(61,220,107,0.34); border-radius: 16px; box-shadow: 0 6px 22px rgba(0,0,0,0.32);
    min-height: 92px; }'
Replace YOURSCENE1 with the id shown for that Scene on the app's synced control list. One tile per Scene, in a horizontal-stack.
The projector sensor is recorded by Home Assistant like any other, so lamp_hours has a history for free. No extra sensors, no helpers, nothing to configure first, under the Maintenance section.
type: custom:mini-graph-card
entities:
- entity: sensor.YOUR_PROJECTOR
  attribute: lamp_hours
  name: Laser hours
name: Laser hours
icon: mdi:lightbulb-on-outline
line_color: '#3ddc6b'
line_width: 4
hours_to_show: 336
points_per_hour: 0.5
height: 96
animate: true
card_mod:
  style: 'ha-card { background: rgba(18,26,20,0.60); border: 1px solid rgba(61,220,107,0.20);
    border-radius: 16px; box-shadow: 0 6px 22px rgba(0,0,0,0.32); backdrop-filter: blur(8px); }'
336 hours is two weeks. Laser and lamp hours climb steadily rather than jumping around, so a two-week window is usually enough to see the trend without the graph looking flat.
The complete view, every section and every card from the screenshot at the top of this page, with placeholders instead of entity IDs.
YOUR_PROJECTOR with your projector sensor's entity id from step 2, and YOURSERIAL with your serial-derived id from step 2.YOURSCENE1, YOURSCENE2 and YOURSCENE3 with your own three Scene ids, or add and remove tiles to match however many Scenes you actually have.configuration.yaml, Home Assistant is restarted, and you have tapped Sync With HA.Check the attribute name against what the sensor actually carries: Developer Tools › States, your sensor.YOUR_PROJECTOR entity, and read its attribute list. A few readings, like HDR PQ or HDR HLG, only populate while the projector is actively receiving that kind of signal, so Unknown on those two can be correct rather than broken. If the whole sensor looks sparse, wake the projector: a unit in standby publishes very little.
You have not pasted the Copy block yet, or Home Assistant has not been restarted since you did. Control and Scene buttons call scripts the app writes, and those scripts do not exist until Settings › Home Automation › Home Assistant in the app has Copy block pasted into configuration.yaml, Home Assistant restarted once, and Sync With HA tapped. Run Test Connection in the app first - it tells you whether the block is present before you go looking for a dashboard mistake.
Filter on projpilot rather than the full serial - it is easier to see the whole list. If a control or Scene you added recently is missing, tap Sync With HA again; it updates in place rather than requiring a fresh setup. If old, dead scripts are cluttering the list after you deleted a Scene, use Remove orphaned scripts in the app.
The pattern is fixed, the middle is not. Your sensor is named after your own projector's model, and every script carries your own projector's serial, not the placeholders on this page. Get both from Developer Tools › States and the app's Home Assistant screen, as in step 2, and use those instead of typing the example text.
Home Automation is a one-time add-on. No subscription, no account, no cloud. One purchase unlocks it on every platform you own.
 Projector Pilot